Related Links
Squash Hand-Pollination
")
Squash Hand-Pollination
In order to reduce the chance of accidental crossing, all squash varieties should be planted at a minimum isolation distance of 1/2 mile apart. Where this isolation distance is impossible, hand-pollination of squash ensures that the plants produce true-to-type seed and that the flowers are not contaminated by the pollen from another variety.
Because the large male and female blossoms are easily distinguished, hand-pollinating squash can be easy for gardeners of all skill levels.
The hand-pollination process varies among species. With plants that produce unisexual flowers like squash, the uncontaminated pollen from male flowers is transported to the un-pollinated stigma of female flowers.
Once the pollen is transferred, the female blossom is covered to prevent pollinators that may be carrying foreign pollen from contaminating the stigma.
NOTE: Squash varieties only need to be hand-pollinated or isolated if being grown for seed saving.
Squash Species
In total, there are four common species that gardeners recognize as squash; all of which are pollinated by insects:
- Cucurbita argyrosperma (cushaw types and silver-seeded types)
- Cucurbita maxima (banana, buttercup, hubbard, turban, kabocha, and most pumpkins)
- Cucurbita moschata (butternut, cheese types)
- Cucurbita pepo (acorn, scallop, spaghetti, crookneck, zucchini, delicata).
Though the species do not generally produce fertile offspring when they cross, occasionally they do (see diagram below); thus it is safest to take steps to isolate all squash varieties from each other, regardless of species.

How to Hand-Pollinate Squash
Materials
- Flagging tape (for female flowers)
- Masking tape (for male flowers and for female flowers after pollination)
- Clothes pins (optional for male flowers)
- Sharpie (for labeling flagging tape after pollination)
- Flags/markers (2 colors, one for female flowers/one for male flowers, are helpful but not needed)
Identifying Blossoms
The male (pollen producing) and female (seed producing) squash flowers can be easily distinguished from each other.
- Female flowers have an enlarged ovary just below the flower which resembles a small squash fruit and males lack this swollen structure.
- Male flowers also start to form before females and are attached to longer peduncles (flower stems).
When to Pollinate
Hand pollination cannot begin until both male and female flowers are present in planting. In the evening before pollinations are performed, identify male and female blossoms that are beginning to show a yellow flush of color, particularly along the seam of the flower petals. This indicates that they will be ready to open the next day (Figure 1).
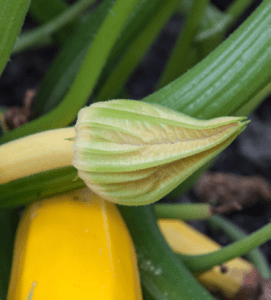
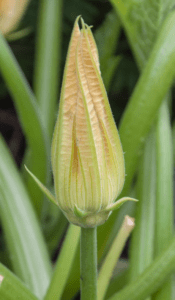
Figure 1. Female and male lowers will begin to show a yellow flush of color at the tips of the petals the day before they will be ready for pollination.
These flowers are called “tomorrow flowers.” Generally, there will be fewer female “tomorrow flowers” than males. This is good because it is best to pollinate each female with more than one male flowers. Though one male flower has more than enough pollen to pollinate one female flower, pollinating females with three or more different males will help to capture more genetic diversity.
Do not work with tomorrow flowers that have holes in them or that are partially opened at the tip as they may be contaminated by foreign pollen.
Although squash plants bloom continuously over the course of the growing season, each flower opens for just one day, and hand-pollination requires some planning and attention to timing.
The process of hand-pollinating a squash flower occurs on two consecutive days. The process begins in the late afternoon of the first day, when flowers that will open the following day are identified and secured shut, and is completed the next morning, when the flowers are pollinated manually.
Covering Blossoms
Seal the tips of the male blossoms shut using 3/4” masking tape, clothes pins, or flagging tape (Figure 2), and tie the tips of the female blossoms shut using flagging tape (Figure 3). As the season progresses and the vines become increasingly vigorous, it is helpful to also use marking flags to mark the location of taped flowers.
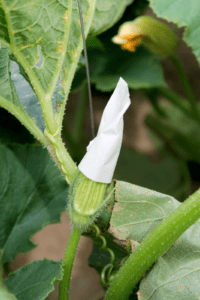
Figure 2. Tear a piece of tape off roughly 4” long, place the tape half-way down the petals, and fold over. Give a good press to the sides that you just stuck together so the seams are completely sealed, being careful not to damage the flower.
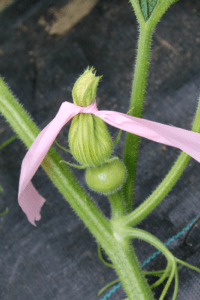
Figure 3. Tie female flowers far enough down the petals that the top is completely sealed but not so far that the stigma is bruised by the tie.
Preparing Flowers
Return the following morning after the dew has dried to locate the male and female blossoms that were taped, pinned, or tied shut the previous evening.
- Begin hand-pollination by harvesting all the male flowers, picking them off the plant at a point three or four inches down the flower stem.
- Divide the male flowers evenly among the female flowers and place them next to the taped female blossoms.
- Remove the tape, clothes pin, or flagging tape and the petals from each male blossom individually as each female flower is pollinated (Figure 4).
- Once all three of the male flowers are un-taped, immediately tear off the top portion of the female, just below where it was tied (Figures 5 & 6). Be prepared to shoo away any foraging bees that may try to enter this unfettered flower as they may be carrying stray pollen from other varieties. If a bee gets to a flower that was taped shut, do not assume the resulting seeds will be true-to-type.
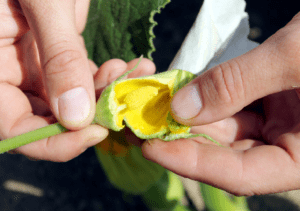
Figure 4. When ready, tear the petals from the harvested male flowers in preparation of pollinating the females.
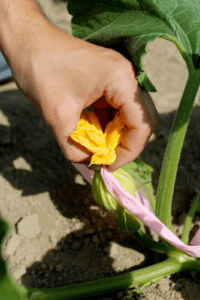
Figure 5. When using flagging to tie female flowers, remove the flagging or tear the petals just below the flagging when ready to hand pollinate.

Figure 6. Once male and female flowers have been opened, work quickly to complete the hand pollination to prevent unwanted insect visitors.
Pollinating
Working quickly, use the male flowers as brushes and swab the pollen-covered anthers of the male flower onto each of the three lobes of the stigma of the female flower (Figure 7). Repeat this with the remaining male flowers before moving onto the next female flower.
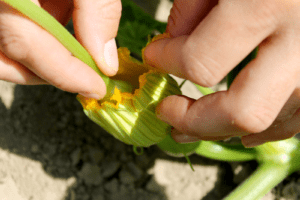

Figure 7. Carefully rub the stamen over the pistil in the female flower, transferring as much pollen as possible.
Taping Female Flowers
Immediately after pollination, tape, tie, or pin the female flowers shut again (Figure 8). If using tape, handle the fragile petals gently to avoid tearing. At this point, don’t press too hard, or twist the flower at all, or it may fall off the plant.
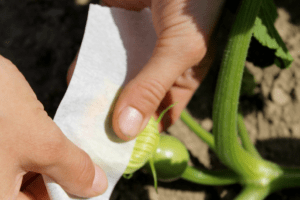
Figure 8. Carefully tape the petals of the female flowers, making sure to seal the tape tightly.
Flagging Pollinated Flowers
Loosely tie a piece of flagging tape around the stem of each female pollinated immediately after pollination (Figure 9). This marker may simply serve as a visual reminder that this fruit is for seed not for eating, but it may also include useful information, including variety and hand-pollination date.
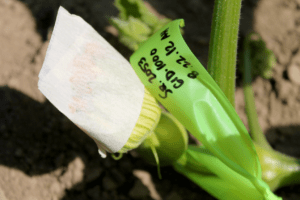
Figure 9. At the end of the hand-pollination process, female flowers should be taped so that no additional pollen can reach the stamen and flagged with flagging tape for identification.
Next Steps
Learn how to grow and save squash seed
To ensure viable seeds, save seeds from at least 1 plant. When maintaining a variety over many generations, save seeds from 5 – 10 plants. If you’re saving seeds for genetic preservation of a rare variety, save seeds from 25 plants or more.
Assessing Seed Maturity
At seed maturity, summer squash will be much larger than their market- mature size, and they typically undergo a color change. Fruits are ready to harvest when the rind is too hard to dent with a fingernail and the stem is dry.
Winter squash are typically mature when fruits are normally harvested for eating: after they change color and fruit stems are dry.
Harvesting
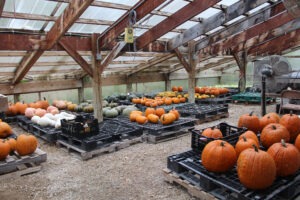
All types of squash benefit from a period of post-harvest ripening during which the seeds continue to mature. Fruits are typically held for at least 20 days beyond fruit maturity before their seeds are extracted.
Although they can further ripen on the vine, squash are susceptible to diseases and sunscald, and it is generally recommended that fruits be harvested and moved to a shady location or indoors for post-harvest ripening.
Commercial seed growers process winter squash after 20 days, but seeds can be extracted from squash later in the winter instead, when the fruits are used for cooking.
Cleaning Seeds
To remove squash seeds from the fruits, simply split the squash in half by shallowly cutting through the rind from top to bottom on both sides and separating the two halves. Cutting through the center of the fruit can damage seeds.
Next, scoop out the seeds, massaging them free from the pulp as much as possible. Transfer them to a wide-mesh strainer—or any other container with openings large enough for pulp and strings to pass through—for rinsing.
Running the seeds under a strong stream of water will help dislodge the seeds from the pulp. When working with varieties whose seeds are hard to separate from the pulp, soaking the seeds for a few hours can facilitate cleaning. Large screens made from quarter-inch hardware cloth work well for cleaning and rinsing big batches of seeds.
Immediately after cleaning, rinsed seeds should be spread out to dry in a thin layer on screens, if possible.
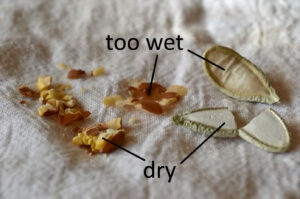
Squash seeds, the two seeds shown on the right of this image, are fully dry when they can easily be snapped in half.
Processing Seeds
Decanting can be a good way to separate viable seeds from lightweight and underdeveloped seeds. Decanting simply means pouring out the mixture of water, pulp, and immature seeds off the top of the liquid, while keeping the mature, viable seeds at the bottom of the glass. This method is only effective for some types of squash because even the viable seeds of many varieties will float, rather than sink.
Alternatively, winnowing can help separate lightweight and underdeveloped seeds once the seeds are dry.
When fruits are processed individually – such as when winter squash seeds are extracted as a meal is prepared – the seeds should be cleaned and then mixed in and stored with seeds of other fruits from the same planting, in order to maintain the genetic diversity of the seed crop.
Storage and Viability
When stored under cool, dry conditions, squash seeds can be expected to remain viable for six years.