Keep Exploring
When you make a purchase from Seed Savers Exchange, you help fulfill our nonprofit mission to protect our food and garden heritage. Do even more good by making a donation to help us preserve and share even more heirloom varieties!
")
One of our most popular vegetables, heirloom squash is a versatile crop for growing in gardens year in and year out. Squash will continue to ripen after harvest, and can be used in both sweet and savory recipes
There are four species of domesticated squash that are commonly grown in gardens: winter squash, pumpkin, summer squash, and gourds. All four species are essentially cultivated in the same manner, but members of the different species will not cross with one another, allowing a seed saver to grow multiple squash species at the same time.
Sow seeds outdoors after the danger of frost has passed in the spring, or start from seed indoors and transplant out in the spring.
Create 12-inch diameter hills 6 feet apart. Plant 6-8 seeds per hill and later thin to 3-4 plants per hill. Sow seeds 1 inch deep.
5-10 days
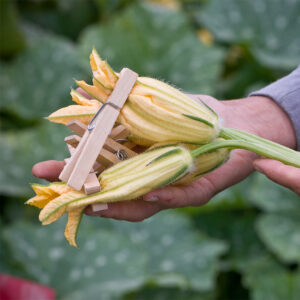
When growing squash for seed, maintaining variety isolation by hand-pollination is recommended.
Common pests include aphids and slugs. To treat aphids, spray the affected parts of the plant with a mixture of dish soap and/or neem oil diluted with water, about 1-2 tsp per quart. To manage slugs, create a beer trap by burying a container in the ground so that the rim is level with the soil, and fill with several inches of beer. Empty and refill the trap every couple of days.
Vine borers can also pose problems to squash and other vining crops. To manage vine borers, utilize crop rotation between seasons and try covering the plants with row cover until they begin to flower. Some gardeners even put aluminum foil around the stem, from the soil to the first leaves, to prevent vine borers from laying eggs.
Common diseases include powdery mildew, downy mildew, and cucumber mosaic virus. Watch plants carefully for signs of this cucumber mosaic, which includes yellow mottling, puckering of leaves, and rotting fruit, and remove plants from the garden.
Do not place infected plants in the compost pile that you use for your garden. Aphids can carry the virus, so you may want to consider pest control methods to control aphids in the garden.
As there are four different species in the squash family, harvest time varies by species and variety.
Yellow squash and zucchini should be cut from the vine with a knife, leaving about ½-1 inch of stalk on the fruit. The best time to harvest zucchini for eating is when the fruits have reached 6-10 inches, though they are also edible past that point. Smaller zucchini are best for cooking and larger zucchini are better for baking.

As winter squash reach maturity, their shell color will often deepen and either brighten up or take on a dull sheen. Harvest winter squash when the fruit has changed color and the stems are dry.
Harvest winter squash by cutting the squash from the vine, leaving at least three inches of the stem intact. Breaking squash off the stem at the base can cause decay in this area.
Squash has diverse culinary uses. Pumpkins are used to make pies, and their seeds can be roasted. Zucchini and yellow squash are versatile and often incorporated into stir-fry recipes and omelets.

Try making “Cheesy Zucchini Breadsticks” or “Colache.” Butternut squash (and others) can be used in soups or roasted. Check out this recipe for “Baked Winter Squash with Maple Nut/Seed Butter” from Ros Creasy, author and advisor to Seed Savers Exchange.
Zucchini and yellow squash will last 2-3 days at room temperature and a week or more in the refrigerator.
In contrast, winter squash with thicker, harder skin can last significantly longer – up to several months, depending on the species. Storing winter squash over the long term usually requires a period of curing that toughens up the shell.
Learn how to store winter squash.
There are four species of domesticated squash that are commonly grown in gardens. All four species have the same mating system and are essentially cultivated in the same manner when grown for seed. However, generally, a seed saver can grow one variety of each species for seed without worrying about crossing.
Annual
Separate varieties by 800 feet to ½ mile.
When this isolation distance isn’t possible, or when growing more than one squash variety, hand-pollination ensures that the squash plant’s flowers are not contaminated by pollen from another variety. This will ensure that the plant produces seeds that are true-to-type.
To ensure viable seeds, save seeds from at least one plant. When maintaining a variety over many generations, save seeds from 5 – 10 plants. If you save seeds for genetic preservation of a rare variety, save seeds from 25 plants or more.
At seed maturity, summer squash will be much larger than their market-mature size, and they typically undergo a color change. Fruits are ready to harvest when the rind is too hard to dent with a fingernail, and the stem is dry. Winter squash are typically mature when fruits are normally harvested for eating: after they change color and fruit stems are dry.
All types of squash benefit from a period of post-harvest ripening during which the seeds continue to mature. Fruits are typically held for at least 20 days beyond fruit maturity before their seeds are extracted.
Although they can further ripen on the vine, squash are susceptible to diseases and sunscald, and it is generally recommended that fruits be harvested and moved to a shady location or indoors for post-harvest ripening.
Commercial seed growers process winter squash after 20 days, but seeds can be extracted from squash later in the winter instead when the fruits are used for cooking.
To remove squash seeds from the fruits, split the squash in half by shallowly cutting through the rind from top to bottom on both sides and separating the two halves. Cutting through the center of the fruit can damage seeds.

Next, scoop out the seeds, massaging them free from the pulp as much as possible. Transfer them to a wide-mesh strainer—or any other container with openings large enough for pulp and strings to pass through—for rinsing.
Running the seeds under a strong stream of water will help dislodge the seeds from the pulp. When working with varieties whose seeds are hard to separate from the pulp, soaking the seeds for a few hours can facilitate cleaning.

Decanting can be a good way to separate viable seeds from lightweight and underdeveloped seeds. Decanting simply means pouring out the mixture of water, pulp, and immature seeds off the top of the liquid while keeping the mature, viable seeds at the bottom of the glass.
This method is only effective for some types of squash because even the viable seeds of many varieties will float rather than sink. Alternatively, winnowing can help separate lightweight and underdeveloped seeds once the seeds are dry.
Large screens made from quarter-inch hardware cloth work well for cleaning and rinsing big batches of seeds.
Immediately after cleaning, dry the seeds in a thin layer on a surface with good airflow. While a setup as simple as spreading them thinly on a paper plate or coffee filter and leaving them for a week is adequate, drying will be more effective if seeds are spread on a screen so that air can reach the bottoms of the seeds. (Using a fan to blow air on them works well.)

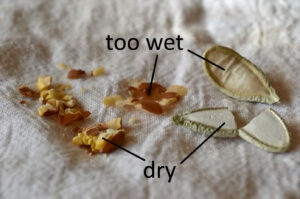
Try a snap test to determine when the seeds are completely dry. To do this, snap or crush a few seeds. Seeds that shatter or break cleanly are thoroughly dry and ready for storage. Seeds that bend, squish, or smash need more time to dry before storing.
When stored under cool, dry conditions, squash seeds can be expected to remain viable for six years.
Follow along with Alan, former SSE greenhouse coordinator, as he harvests, rinses, and dries ‘Giraumon de Martinique’ squash seeds.
Keep Exploring
When you make a purchase from Seed Savers Exchange, you help fulfill our nonprofit mission to protect our food and garden heritage. Do even more good by making a donation to help us preserve and share even more heirloom varieties!