Keep Learning!
A Beginner’s Guide to Potting Up Seedlings

A Beginner’s Guide to Potting Up Seedlings
There’s something deeply rewarding about nurturing a tiny seed into a thriving plant. But when a plant outgrows its container, potting up can seem daunting. Fortunately, with care and a couple of considerations, potting up is easy and will help to keep your plants happy!
In this post, we will explain the benefits of potting up and how we do so here at Heritage Farm. We will also show you when and how to pot up your seedlings, and give you some helpful tips. Whether you’re a first-time gardener or brushing up on your green thumb skills, this guide will help you set your seedlings up for success.
What is “potting up”?
Potting up is the process of moving a plant up from one size of a container to a larger size as it needs more space to grow.
Usually, potting up is only a common practice for crops that have an extended germination period or spend a long time growing in the greenhouse, such as:
Why should I pot up my seedlings?
Simply put, potting up seedlings will allow them to grow into large, healthy, and happy plants. Caring for indoor seedlings is a delicate process, and young plants are sensitive to their environment.
As a seedling grows bigger and occupies more and more space within its pot, it can begin to get crowded. Crowding creates various problems for the plant:
- It depletes the nutrients available to the plant through the soil.
- It causes the seedlings to dry out faster and need more frequent watering.
- It can stunt the growth of the seedling.
- It can cause the seedling to grow leggy and weak.
Giving your seedlings a larger container if they need one reduces stress. This helps them grow strong roots and stems. It also encourages the plants to grow bushier rather than taller.
Why not sow seeds in a larger container to begin with?
If you garden on a small scale and aren’t worried about running out of indoor space, starting seeds in larger containers is perfectly okay! However, there are risks with sowing seeds into pots that are too large.
When starting seeds indoors, it’s important for the size of the seedling to roughly match the size of its pot. This has to do with water management. As you water the seedlings, the water saturates the soil. The water that soil absorbs leaves in two ways: evaporation or transpiration by the plant.
If a seedling is too small for its container, its tiny roots can only absorb a little bit of the water. Most of the soil in the pot stays saturated and will not dry out. This can lead to root rot, yellowing leaves, stunted growth, mold, and disease.
Potting up at Heritage Farm
On a larger scale, potting up helps with space and resource management. Here at Heritage Farm, we grow thousands of seedlings in our greenhouses each spring. At this large scale, we need to plan our greenhouse space efficiently to avoid running out of room.
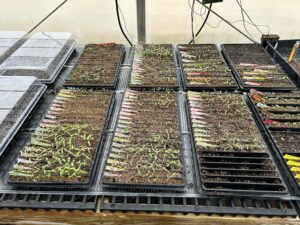
For example, this year, we grew 1,300 tomato plants and sowed the tomato seeds in “20-row” trays. These trays each have 20 small rows, which can each fit 20-30 tomato seeds. A whole 20-row tray can therefore fit upwards of 600 tomato seedlings.
A tray of the same size can only fit 32 3-inch pots. The same 600 tomato seedlings in 3-inch pots would need upwards of 19 trays, and a whole lot of greenhouse space.

Starting seeds in small pots also helps to mitigate the challenges of low germination. If a tomato variety has low germination and some seeds don’t germinate, this wastes the space and resources used to start those seeds.
When growing tomatoes in 20-row trays, an instance of low germination might only waste a few square inches of greenhouse space. If we had planted tomato seeds in separate 3-inch pots, a few square inches would turn into half a tray of wasted space, soil, and water.

When should I pot up my seedlings?
Look for these signals to know when to pot up your plants:
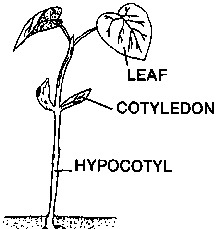
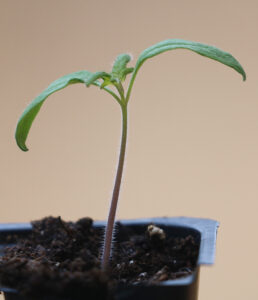
True leaves: An easy way to tell whether a seedling is ready for potting up is to look for true leaves. When a seedling germinates, it produces its first set of leaves, called cotyledons, from the material within the seed. These leaves often look quite different from the leaves that the plant continues to grow.
The second set of leaves that the plant produces is the first of its “true” leaves. The plant will grow true leaves for the rest of its life. Once a seedling has at least one or two sets of true leaves, it can handle the stress of potting up.
Emerging roots: Look beneath the pot. When a plant outgrows its pot, often (but not always) the plant’s roots will begin to grow out of the pot’s drainage holes. If you see any root growth outside the pot, the plant needs a larger space to grow.
Holding shape: Carefully remove the seedling from its pot. The seedling’s roots should hold the shape of the media well. This indicates strong root growth and that the plant can handle the potting-up process.

Watch this video to learn when to pot up tomato seedlings:
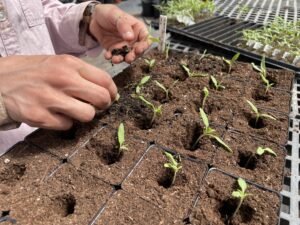
How to pot up seedlings
Step 1: Water your seedlings in the morning of the day you plan to pot up, saturating the seedlings’ roots. Saturated roots help mitigate the shock of transplanting.
Make sure the aerial parts of the plant (such as the stem and leaves) are dry to help prevent damage when handling.
Tip! Just like transplanting seedlings outdoors, try to pot up on a day where the weather is overcast. This will help the roots stay moist.
Step 2: Gather your new containers and some potting mix. Make sure your containers of choice have drainage holes.
Your soil mix should be rich in compost or other organic matter to give the seedling an extra boost of nutrients. The soil mix should also be damp, but not too wet, and should not drip when squeezed.

Step 3: Fill the new pots with soil and create divots in the centers, keeping in mind the size and depth of the seedling.
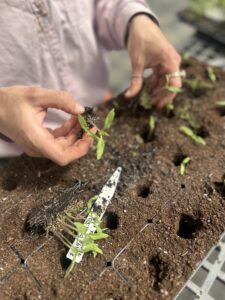
Step 4: Carefully remove the seedlings from their old pots. If you have only one seedling per pot, it is unnecessary to disturb the roots unless the plant is very root-bound.
If you have more than one seedling per pot, gently tease apart their roots and separate the plants. When teasing plants apart, some roots will break, and you may hear some pops and tears. These sounds may alarm gardeners, but as long as the seedlings have their main roots attached to the stem, they will be fine.

Step 5: Carefully place the seedling into the divot in its new pot and cover its roots with soil. Gently pack the soil around the base of the plant, but don’t be afraid to apply a little pressure. This helps prevent air bubbles beneath the surface, ensuring good soil-to-root contact.

A note on planting depth:
Tomatoes, like eggplants and peppers, benefit when planted deeper than the soil line. Along a tomato seedling’s stem are tiny nodes that have the potential to develop into adventitious roots. Plant the tomato seedlings deep enough so that the soil reaches just beneath its cotyledons.


Most food crop seedlings with stems can handle having part of their stem buried.
Be careful not to plant the seedling too deep. Avoid getting any soil on top of the growing point of the plant, from which the plant will continue to produce new leaves. At the tender growing point of the plant, soil can damage the leaves and invite disease.
Step 5: Immediately water the seedlings in their new containers. Working with moist or slightly dry soil is easier when potting up. However, this can wilt the plants quickly, especially on sunny days. Water potted up seedlings immediately to saturate the new soil in the pot. This will alleviate stress for the newly transplanted seedling.